Showing posts with label DCWV. Show all posts

Saturday, December 1, 2012

December 100 Cricut Cart Blog Hop with MCCR

Welcome to My Cricut Craft Room's Monthly 100 Cartridge Blog Hop for December!!


If you got here from Mary's blog, great you are on the right track!
If not, head to My Cricut Craft Room to see all the great projects along the way!!

I had 4 cartridges to use this month. I combined them and made two projects.

For my first one, I wanted to do something Christmas since it is right around the corner


I used Teresa Collins Sophisticated and Gingerbread for this project. The scallop border is from Sophisticated (page 44, cut at 1 inch), the swirl is also from the same cartridge (cut at 2 inches). The wreath is from Gingerbread cut at 2.5 inches.

I added stickles in xmas red, green, gold and diamond to decorate my wreath. The paper is from last year's (I think) DCWV christmas mat stack.

For my other project I still needed some birthday cards so that is what I worked on!!

I used Pretty Pennants and Celebrate with Flourish for this project.
The pennants are cut from Pretty Pennants at 2 inches for the small ones and 3 inches for the large middle one. The happy birthday is from Celebrate with Flourish and was cut at 2.5 inches.
I ran the middle pennant through a cuttlebug folder and sanded the raised area. The pattern paper is from Echo Park - A Walk In The Park 6x6 paper pack. I inked everything in Quick Quotes Powder Puff Ink in Pink Cheeks.

Well I hope that inspires you to get out your cricut and start creating!!

Your next stop on the hop is my DT sister Teresa!!! 
Wait til you see what she has in store for you!

Have a great weekend!!

Here is the full line up in case you get lost along the way!!
Jen 
Liz <--- are="are" here="here" you="you">


Friday, November 23, 2012

Past Christmas Mornings with My Cricut Craft Room

Hope everyone is over their Turkey-coma today and got some great deals on black friday shopping!

Today with My Cricut Craft Room, our theme was past Christmas mornings.

I pulled out a DCWV christmas stack (I have 3 of them so I am not sure which year this one is from) and I saw this LOVE piece that I knew I wanted to use. 

I went through the past 3 years of Christmas photos and found that this is the ONLY picture of both my boyfriend and I on a Christmas day. So sad. So I have made sure to tell him we must get a picture of the two of us on Christmas morning this year.


I used Gingerbread to make my garland. They are all cut at 2inches. I love making the little guy and girl hold hands :)

Add some twine (in Maraschino and Peapod) and that was it! I love how this turned out and how quick and easy it was! This will be the front page in a Christmas album. I think I am going to do all my Christmas photos in one year arranged by year.

I hope you enjoyed my page!

~Liz 

Thursday, October 18, 2012

Anything Goes with Just A Scrappin'

This week's challenge at 


ANYTHING GOES!!

Who doens't love this challenge!? Just finish up anything you are working or or use it as an excuse to get that page or card you have been wanting to do done!
:)

I worked on a layout for my co-worker's album. She wanted a sisters page to put pictures of her two girls together on.

I used some felt flower borders I had and added stickles to the middle to make them pop

Sister is cut from Teresa Collins 

I used Quick Quotes Powder Puff Inks in Purple Passion, Blue Hawaiian and Lemonade to ink around the edges of the paper. The paper is an old stack from DCWV. 

Hope you like my page and will play with us this week at Just A Scrappin'!!


Friday, July 13, 2012

We all have birthdays!

Yes, we do! We all have birthdays! Every year!

So birthday pages are always needed! I LOVE this stack from DCWV, Celebrations! It is all birthday themed stuff. My co-worker is really getting some great pages!


I inked everything with QQ Powder Puff Ink in Blue Hawaiian.

I added twine accents in Maraschino.

and lots and lots of stickles!!
I pulled some coordinating ribbon from my stash and used Tim Holtz Tiny Attacher to make little flags by the journal lines.

I love the paper and I really think it showed!

Remember to stop by tomorrow for the Just A Scrappin blog hop!!

~Liz

Saturday, June 30, 2012

Home Love Family

Who still loves 2page layouts!?!?!
I do! Good thing I have been doing so many of them lately!
A family page is always needed in a scrapbook. My co-worker requested that I title it Home. Love. Family. I have this DCWV stack that I have wanted to use forever and it just screams family at me. So I pulled out Linen Closet and got to work!
I was inspired by a page I saw on A Page for All Seasons blog that I saved as an idea a long time ago. I used their page as a sketch for this one. I inked everything in Quick Quotes Powder Puff Ink in Biscotti and a little bit of Blue Hawaiian.

Here you can see the border on either side of the large photo mat on page 1. There was a pattern sheet in the stack that was all of these scallops. I cut 2 out and added them to the sides as borders!

I usually hate making bows but I felt like this layout really called for it. I wanted it to lay pretty flat so I put my ribbon all the way across the page first, then tied a bow with the same ribbon and glued it on top.

Home, Family and Love were all cut from the Teresa Collins Sophisticated Cricut Cartridge. I layered the blue from the stack with some cream to make the words stand out. 

I added some Twine in Cappuccino and Caribbean at the bottom of the small photo mats to add some interest.

I hope you like this soft family layout. 

~Liz

Thursday, June 28, 2012

Just A' Scrappin' - First Design Team Challenge!

MY FIRST DESIGN TEAM PROJECT!!

Can you tell I am a bit excited? hehe

Over at Just A Scrappin' they are having a new challenge this week:

WEDDING

The challenge runs for a week so I hope you will join us this week :)

 I have a wedding to attend later this year that the color is purple. I had a scrap of this purple rose paper from a previous layout that immediately came to mind. Pretty sure it is really old DCWV paper.

I wanted to something a little non-traditional wedding (which fits the couple) so I did a card made from acrylic instead of cardstock. I found this great vellum quote from Quick Quotes that I layered behind another piece of the pattern paper and made a frame to go around it. Added some flowers, pearl pen dots, twine and glue butterflies covered with purple glitter.

 
I love the way the butterflies show through to the inside of the card. When doing an acrylic card, you have to cover everything you did from the back to the front. So I cut more purple squares for the inside. I decorated one side with another piece of pattern paper and the other square to write a message to the couple.

Here is the back of the card. You can still see the butterflies which I love. I added the square to the back to hide the glue holding the inside square on.


I hope you like my card and that you will join us for this great challenge. Remember, every entry for the month gets entered to win some blog candy! Who doesn't love blog candy!?


Friday, June 22, 2012

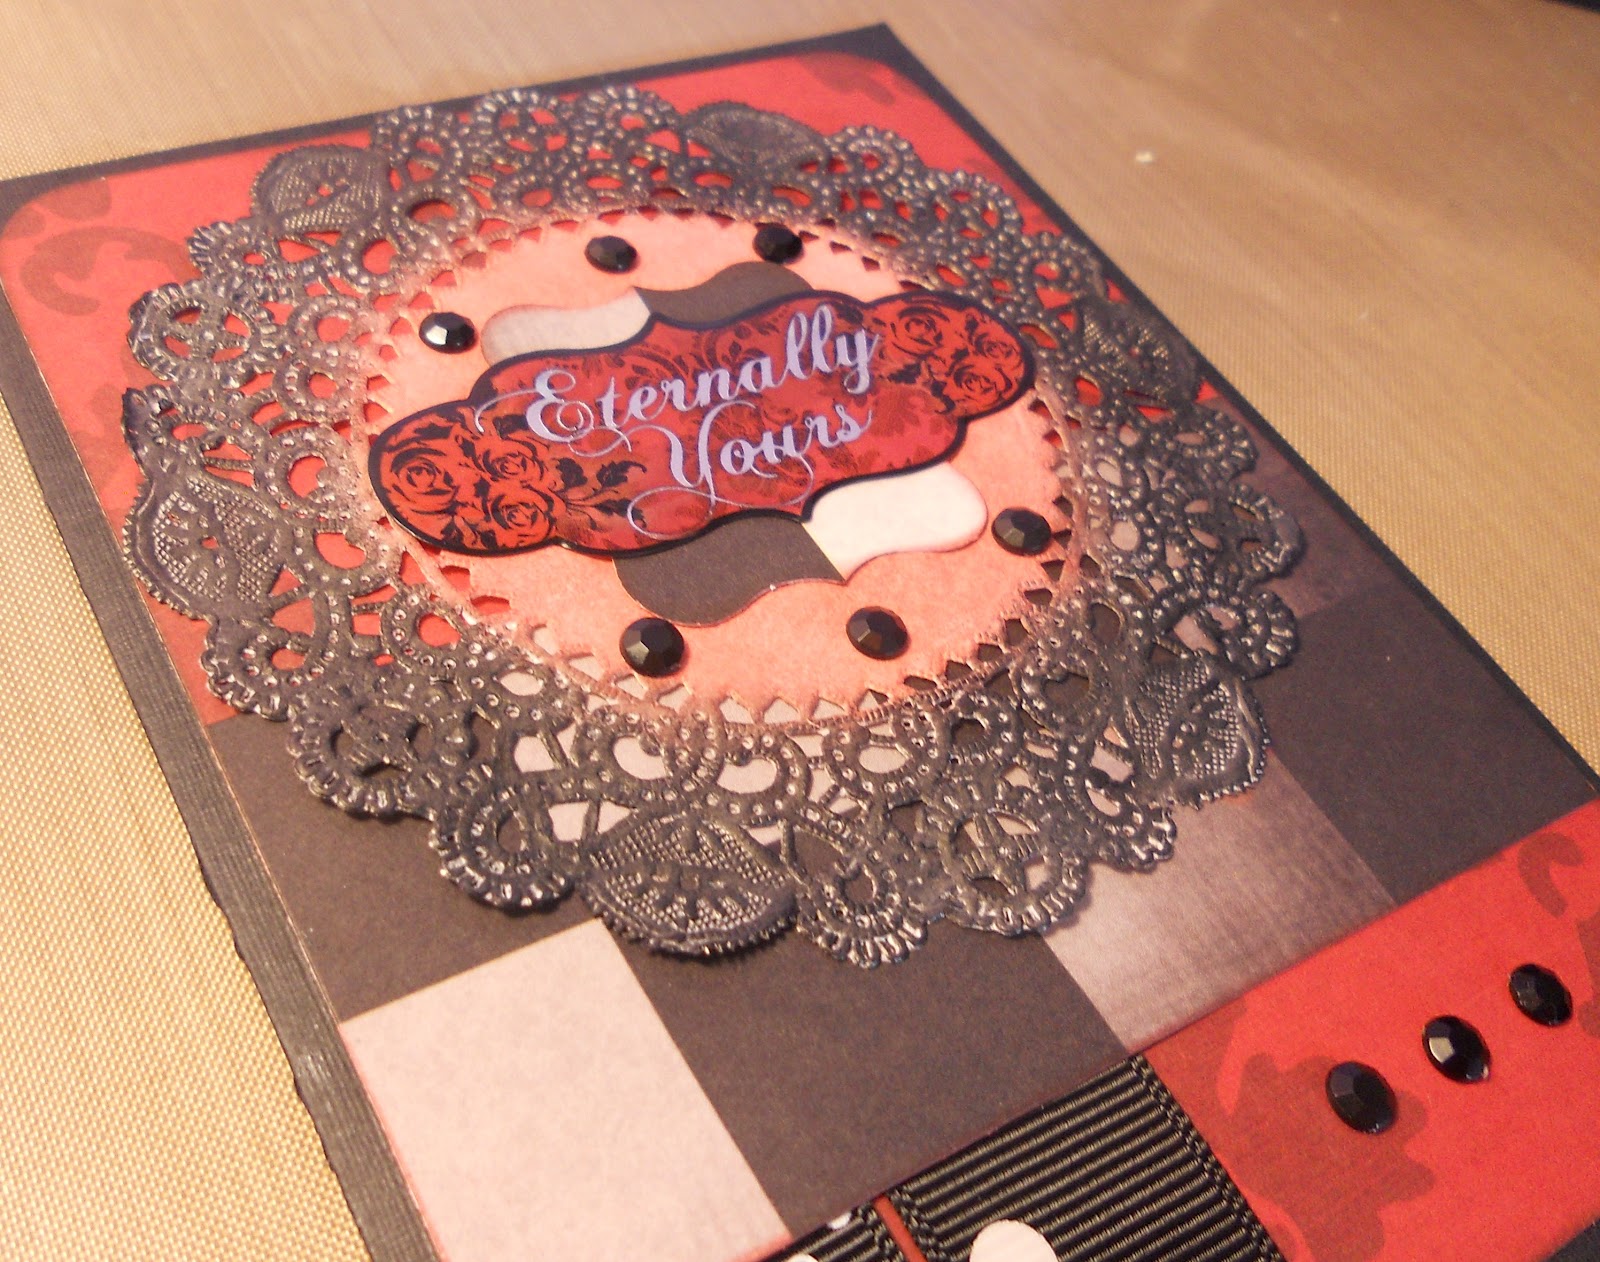
Eternally Yours

Their challenge is to use any past challenge!
So I started looking through the challenges to see what inspired me and I found Challenge #19. Use Red, Black and White!
Those just happen to be my favorite colors :)

I started digging and remembered a wonderful DCWV stack called Immortal Love. So I looked up DCWV's card sketch for this month and got started.

I started out thinking I was going to stay pretty true to the sketch, but my doiley was bigger than I thought it was! It was a white doiley that I inked with Quick Quotes Poweder Puff ink in Midnight Confession and Marchino Cherry. The ribbon is from my stash.

The sticker is from Creative Imaginations. It worked so perfectly with the papers! The bling is from Want2Scrap.

I think I will hold onto this to use for my boyfriend the next time he does something nice. Which, knowing him, will be soon :)

Thanks for joining me this week.

Next week I have another card, another layout and my first design team project!

Have a great weekend :)

~Liz


Wednesday, June 20, 2012

Soccer!!!

Hello again!
Happy First Day of Summer!!

Today I am sharing yet another 2page layout done for my co-worker! I still have lots to go :)
Her daughter is a soccer player and is going to college on a soccer scholarship!
I am doing a soccer page for each year of high school so she can list her achievements and awards each year. 
I started with her Senior year so she would have it for her graduation party last weekend. As you know from my graduation page, her school colors are purple and gold/yellow.

I needed a page with lots of pictures. Action shots, team shot, pictures of awards and friends, individual shots and anything else she has. So I chose paper that wasn't too busy.

Here is a close up of some of the details. The white squares were inked with Quick Quotes Powder Puff ink in Purple Passion. The dots are a Viva Pearl Pen in Violet. 

The Stamped images you see are from Stampin Up! Sporting set. I love that I can use them for any sport. The soccer balls and the Senior are cut from the Sports Mania Cricut Cartridge.

Hope you enjoy the page!

~Liz

Thursday, December 15, 2011

Christmas Cards 2012

Merry Christmas!!!

I wanted to share my Christmas Card for this year. I knew I wouldn't have a ton of time to work on them with all my other crafty projects I am doing as gifts so I choose a simple card to make. I love the way it turned out!!


DCWV mat stacks made this card super quick and easy. I used their Christmas mat stack from this year. I cut 1inch strips from different pattern papers. I didn't have to cut the other length since I was using the mat stack so just 1 cut! I told you these were quick. I cut the reindeer (that may look familiar to you, I told you it was my new favorite Cricut cut!) from Christmas Solutions Cartridge. I added a red bling to make it Rudpoph and used Close to Cocoa Stampin Up marker to color the lines on the cut and the feet.

Hope this goes to show that hand made cards don't have to take forever! There is still time to make yours :)

~Liz

Monday, December 12, 2011

Gift Card Holders 2011 - Round 2

As promised here are some more gift card holders with another one of my favorites!


I love baker's twine. It is the perfect accent when ribbon is just too much or too girly. I have seen similar twine covered items in magazine and other blogs and knew I wanted to try this out. Funny how both of my favorites this year use the Stampin Up ornament punch!


I punched my ornament from red (above) or green (below) cardstock. The color choices are so that if the edges don't quite get covered it would blend with the background. I ran it through my (or should I say my mom's lol) xyron FACE UP. It really didnt matter for this shape but for other shapes it would. I needed the top to be sticky.


I don't know how others have done this, but I started at the outside and worked my way in. I figured it would be harder to try to figure out where the center was to start. I just took my twine and started at the bottom point and using my fingers and occasionally some tweezers just kept going in circles. I did take a little bit of time but I LOVE the end result and will definitely be doing this again. Maybe in an upcoming class? Hmmm......
:)

I also love this ribbon folding technique I saw on Tim Holtz blog way back when. You have seen me use it on other projects if you have been following me all year.


 Some of the DCWV paper is so pretty all I had to do was add stickles! The one in the upper right is a perfect example :)


The law office I work at has a heavy Jewish population so we make sure to include some Jewish gift card holders every year as well. I really liked the way these turned out this year.

Still some more to go so check back tomorrow for more goodies! And see what lovely frame my mom made for the handmade Christmas gift from the crop party!

~Liz


Friday, December 9, 2011

Gift Card Holders 2011

Hi all!

It is that time of year for all things Christmas :)
My Mom and I participated in our job's entrepeuner show again this year and made more gift card holders! You can see some of last year's here. 

I have a lot more pictures this year and want to give a little info on how I did some of these so I'm going to spread this into a couple of different posts.


This is one of my favorite ones this year. For the ornament on the right: I took Tim Holtz tissue tape and stuck it to a non-stick craft mat. I used alcohol inks to color it red. I pulled the tape off the mat and tore the edges to fit onto a white panel that you can see in the picture below (upper left holder). I punched out the ornament using a Stampin Up punch. I used the punch piece on the holder above and the negative below! For the negative I just put a piece of gold cardstock behind the image and used a gold Krylon pen to edge the panel and the holder. 2 items from 1 great technique I saw in a magazine :) Definitely going to be doing that again!


I loved the way all of these turned out and everyone else must have too because we sold out!!!

More Christmas holders to come next week! Hope to inspire everyone to work on their Christmas cards (if you are as behind as I am!)

~Liz

Thursday, December 8, 2011

Christmas Ornament Gift

Hi all!

I have had a BUSY couple of weeks! I think I am finally feeling all better and have had some time to do some crafting. Yay!

I have had this wood cut-out ornament from Archiver's since LAST YEAR! I forgot I had it last year so I pulled it out to do a handmade gift at our crop's handmade gift exchange. You don't know who will get your gift until you get there so I thought an ornament is always a great idea. My mom and I have a tradition that we get each other at least one ornament every year. So I have a very full Christmas tree full of ornaments going all the way back to my first Christmas! Someday I want to make a scrapbook of all my ornaments so I can try to remember where I got each one and why it was special that year. 

When I was trying to think of what to wrap it in, I remembered I got these cute little pouches with a tag from the Mega Meet last year at Melissa Frances' booth. They were super cheap since they were punched wrong (you wouldn't know that since I covered the punch holes) :)

So here is my wrapping and my ornament. I am entering this in a couple of challenges this week.
Over at Papertake Weekly they are having an Anything Goes challenge with the additional option of adding something dangly :) Right up my alley. Wee Memories is also doing a Free for All! Woopie! Lastly For Fun Challenges is challenging us to make Christmas Sparkle! I love sparkle! Let me show you what I did


I love this reindeer from the Cricut Christmas solution Cartridge. I knew immediately I wanted to use him on this. I pulled out my DCWV Christmas stack and found some paper I liked. I choose this pattern since it already looked layered so I didn't have to do anything more to it. I inked the edges with QQ Powder Puff ink in Mocha Mama and added hand stitching Stampin Up! Close to Cocoa.


 I cut a random shape to put the Noel on (I don't remember which cart that is from). I used my liquid pearls to add the white dots to the word. I cut strips of green paper and folded them to look like a ribbon behind the phrase. I used glimmer mist (graphite), my first Christmas sparkle, on the reindeer, the whole phrase with ribbon and the flowers. I used a different glimmer mist (brick) on the chipboard swirls. I love glimmer mist to make everything sparkle!


One you pulled out the tag, which I covered in red paper, you see a white pocket with the ornament inside


Here is the ornament I did. It came in a pack of 2 from Archiver's. They have all kinds of different shapes to choose from. I painted it all white so you couldn't see the brown wood of the cut out. Then I used modge podge across the top and with Martha Stewart glitter, my second Christmas sparkle! It doesn't get much more sparkly thank that! I sprinkled the silver randomly, then I took the red glitter and covered everywhere else. I took some silver bells, my something dangly, and tied them with twine to the ornament so you can hang it from the tree!

I had a TON of fun making this gift pouch and ornament. I hope the recipient enjoys it for years to come :)

~Liz


Related Posts Plugin for WordPress, Blogger...