Showing posts with label The Twinery. Show all posts

Thursday, December 6, 2012

Non-Traditional Christmas with Just a Scrappin

Welcome back!

This week with Just A Scrappin' we are doing

Non-Traditional Christmas Cards
no green and no red!!

Love it! I didn't do a card, I made a gift card holder. Lots of those again this year. 
The base is cut from Stampin' Up's Top Note Die. You fold your paper in half and line is up so that the folded edge is inside the cut line (so it doesn't cut) and you get a cute little folder. Just remember to make a pocket for the inside! 

I decided on a neutral color pallet for my card. The stamps are from Stampin Up, Dasher and Christmas Greetings. I stamped them in Tim Holtz Vintage Photo ink and used the same ink to ink the edges of the cream cardstock. The square with Dasher on it is also glimmer misted in Crocheted Doily (though it is hard to see in the picture). I added some brown fiber and ribbon from my stash and a piece of Cappuccino twine.  Add 3 dots of gold stickles and we are done!

I hope you join us in this week's challenge!! Have a great weekend
:)

~Liz

Thursday, November 29, 2012

Vacation with Just a Scrappin

Welcome back!!

This week over at Just a Scrappin', our challenge is:

VACATION!!
add 3 buttons and at least one ribbon

I think beach when I think vacation. How about you?

 I love this (discontinued) paperline from Quick Quotes for my vacation pictures. I used it here as well. And I pulled out a (discontinued - Seaside) stamp set from Stampin Up to go with my beach theme.

I inked my stamps with Quick Quotes Powder Puff Ink in Tahiti and stamped right on the pattern paper. I also inked the edges of all my paper layers with Tahiti. I added the Thank You sentiment and punched it out. I added Caribbean twine and buttons from my stash.

 I hope you like my vacation thank you card and join us for this week's challenge!!

~Liz

Monday, November 26, 2012

V with MCCR


Good Morning!!! Today with My Cricut Craft Room, the letter of the day is

"V"

I made my Violet Valentine using Sophisticated

The tag is cut at 4in, the heart at 2.5in and the Love at 2in

I embossed the tag and inked the raised parts with Quick Quotes Powder Puff Ink in Purple Passion.
I added some Violet and Silver Chrome pearl pens, a doily, ribbon, twine (in Lilac) and a button from my stash.

I just love the way this turned out :)

Hope you are inspired to do some crafting today!!

~Liz

Sunday, November 25, 2012

Quick Quotes Challenge

Hello everyone!

Hope everyone enjoyed their long weekend and black friday shopping! I know I did! New 55' TV downstairs to prove it. I think my boyfriend is in love. LOL

This month's challenge over at Quick Quotes was to 


I almost missed entering this one as the deadline is today. I knew exactly what I wanted to do when I read the challenge so I took some time today and worked on a page very close to my heart

I still look at some paper and think to myself "Grandma would have loved this line" and that was my first thought with this Cherry Truffle line from Quick Quotes

I inked everything in Quick Quotes Powder Puff Ink in Bloody Mary
I used the Teresa Collins Sophisticated Cricut Cart to cut the "Remember When"

I just love this chipboard tree, also from Quick Quotes. I thought it pulled together the page perfectly and didn't embellish it any more than just adding a bow of Cappuccino Twine around the trunk.

I hope you enjoy the page and check Quick Quotes next week to see what next month's challenge will be!!

~Liz

Friday, November 23, 2012

Past Christmas Mornings with My Cricut Craft Room

Hope everyone is over their Turkey-coma today and got some great deals on black friday shopping!

Today with My Cricut Craft Room, our theme was past Christmas mornings.

I pulled out a DCWV christmas stack (I have 3 of them so I am not sure which year this one is from) and I saw this LOVE piece that I knew I wanted to use. 

I went through the past 3 years of Christmas photos and found that this is the ONLY picture of both my boyfriend and I on a Christmas day. So sad. So I have made sure to tell him we must get a picture of the two of us on Christmas morning this year.


I used Gingerbread to make my garland. They are all cut at 2inches. I love making the little guy and girl hold hands :)

Add some twine (in Maraschino and Peapod) and that was it! I love how this turned out and how quick and easy it was! This will be the front page in a Christmas album. I think I am going to do all my Christmas photos in one year arranged by year.

I hope you enjoyed my page!

~Liz 

Wednesday, November 14, 2012

National Teddy Bear Day with My Cricut Craft Room

Hello everyone! Today is

I am so happy to be joining the My Cricut Craft Room's design team!

Today we had to use a teddy bear that was a feature button on a cartridge. I found mine on Everyday Paper Dolls. I cut it at 2.5 inches. *you must have real dile size on to get actual 2.5 inches*

I layered the bear on a Carta Bella 6x6 paper pack I have on hand.

I added Shore Twine and used my pearl pens in Light Blue and Silver Chrome.

I hope you like my take on this assignment!
Look for posts every week for this team!

Thursday, November 8, 2012

Autumn Stripes with Just A Scrappin

Welcome back!

It is that time of week again. Time for a new challenge from Just A Scrappin'!!

This week it is

SHOW US YOUR STRIPES
Any theme, but use autumn colors!

I thought back to this card I did and how much I love this paper line by Quick Quotes (sorry, its discontinued). It is perfect autumn colors.
I tore a piece of stripe paper and added it to the brown card. I cut the sentiment from another sheet from this line and wrapped Cappuccino twine around it. I fussy cut some leaves from another pattern from this line and added them in a diagonal pattern.

Here you can see the dimension the pop dots give it. I like to pop-dot things I am gluing with twine or over twine so that the paper doesn't end up with creases in it or it looking uneven. I also inked the edges of all the paper in Quick Quotes Powder Puff Ink in Biscotti. 

I hope you join us this week at Just A Scrappin'!!

I also have exciting news! I am a new member on the design team for My Cricut Craft Room!!
Look for my first post for them next week :)

~Liz


Thursday, November 1, 2012

Halloween with Just A Scrappin'

Welcome back friends!!

Hope everyone had a great Halloween yesterday! Halloween is my birthday and I had a lovely day :)

The challenge this week at Just A Scrappin is

HALLOWEEN!!!

Show us what you made yesterday!

Here is a quick and simple card I did
I used a 6x6 paper pad I have. I love those to make cards from since the patterns tend to be smaller than the 12x12 packs. And everything is already coordinated for you!

The stamp is a retired set from Stampin Up! I used Quick Quotes Powder Puff Inks in midnight confession to ink the stamp and the edges of my paper.
The Twinery twine colors are Charcoal and Cappuccino.
The stripe section and the skull section are pop dotted above the rest of the card to add some dimension. I added some stickles (LOVE that stuff!) and I was done!

Hope you like my card and join us this week at Just A Scrappin!

~Liz


Thursday, October 25, 2012

Cheerleader with Just A Scrappin'

Welcome back!

This week's challenge at Just A Scrappin is

CHEERLEADING and add some bling!

Had no idea what I was going to do with this one until I remembered Hello Kitty Greetings has a Hello Kitty Cheerleader! I of course had to do my Buckeye colors. I bleed Scarlet and Gray!!
I think this would be a really cute birthday card for a girl or an adorable card to send to your daughter away at college. OSU of course! lol.

I also did a tutorial on how I created her pom-poms

I started with my scarlet and gray twine, also known as Maraschino and Stone. And a fork

I wrapped the twine around the fork, I think 5 or 6 times in this case

I took another piece of twine and wrapped it around the middle through the tines of the fork

and tie a knot

then trim all the ends so they are even with the sides of the fork


cut the side loop of the twine. It can be a tight fit. It is better to stick your scissors in the loops while still on the fork, then pull it off one side and cut. if you pull it off then try to stick your scissors in the loops it will be hard to get them all without fraying your twine. It can be done, just not as easily.


Then it looks like this

then you just scunch up both ends

I used Beacons to glue them onto my Hello Kitty

and now you have cute color coordinated pom-poms! After the glue dries you can also trim the edges if you have 1 random long string somewhere.

The paper is from Echo Park and I inked the edges in Maraschino Cherry from Quick Quotes. I added a banner cut from Pretty Pennants and silver stickles in middle of them. One last glitter bling I had in my stash and your done!

I hope you enjoy my card this week and join us at Just a Scrappin! 

Think outside the box if you have to on this one. 
Cheerleader can also be a card or layout done in your school colors.
Or a layout with a school spirit title
Or you supporting a friend/family during a fundraiser. (think walk for the cure) or a marathon!

Hope that helps give you some ideas to play along!

Check back next Thursday for our next challenge!

~Liz


Friday, August 24, 2012

Signs of Full Leaves with Just A Scrappin

Hey everyone!

This weeks challenge at Just A Scrappin is

Signs of Full Leaves - No brown and add some brads

This is harder than I thought it would be! I am so glad Quick Quotes sent me some leaf chipboard. Since that was brown, I sprayed it with some gold glimmer mist. I added some peadpod twine behind the cutout and brads from my stash.


The paper is a quick quotes discontinued line. The sentiment is from Jillibean/Unity
Hope you join us in this great challenge. Fall is righta round the corner!
~Liz
remember to check preview posts to enter to win some quick quotes goodies! winner announed next week!

Thursday, August 23, 2012

Halloween preview with Quick Quotes

Welcome back for my last guest designer post with Quick Quotes.

When I saw that Quick Quotes was coming out with a Halloween line I crossed my fingers that I would get some to play with and sure enough when I opened my box there it was! Halloween is my birthday so I tend to scrap any birthday pictures on Halloween paper but I did happen to have some costume pictures waiting to be scrapbooked from a couple years back.
I love the great patterns in this line. Even if you are not into Halloween, the pattern paper alone could really be used for any event. But I of course went all out! The black and white polka dot paper is just begging to be inked. I love that you ink it and the white dots really show the colors. I used Midnight Confession, Purple Passion and Limeade.

I love this velum quote as a title. I layered it on some pattern paper. I cut out a piece of the same pattern paper and fussy cut the chevron pattern to help hold the velum quote down without seeing the glue.

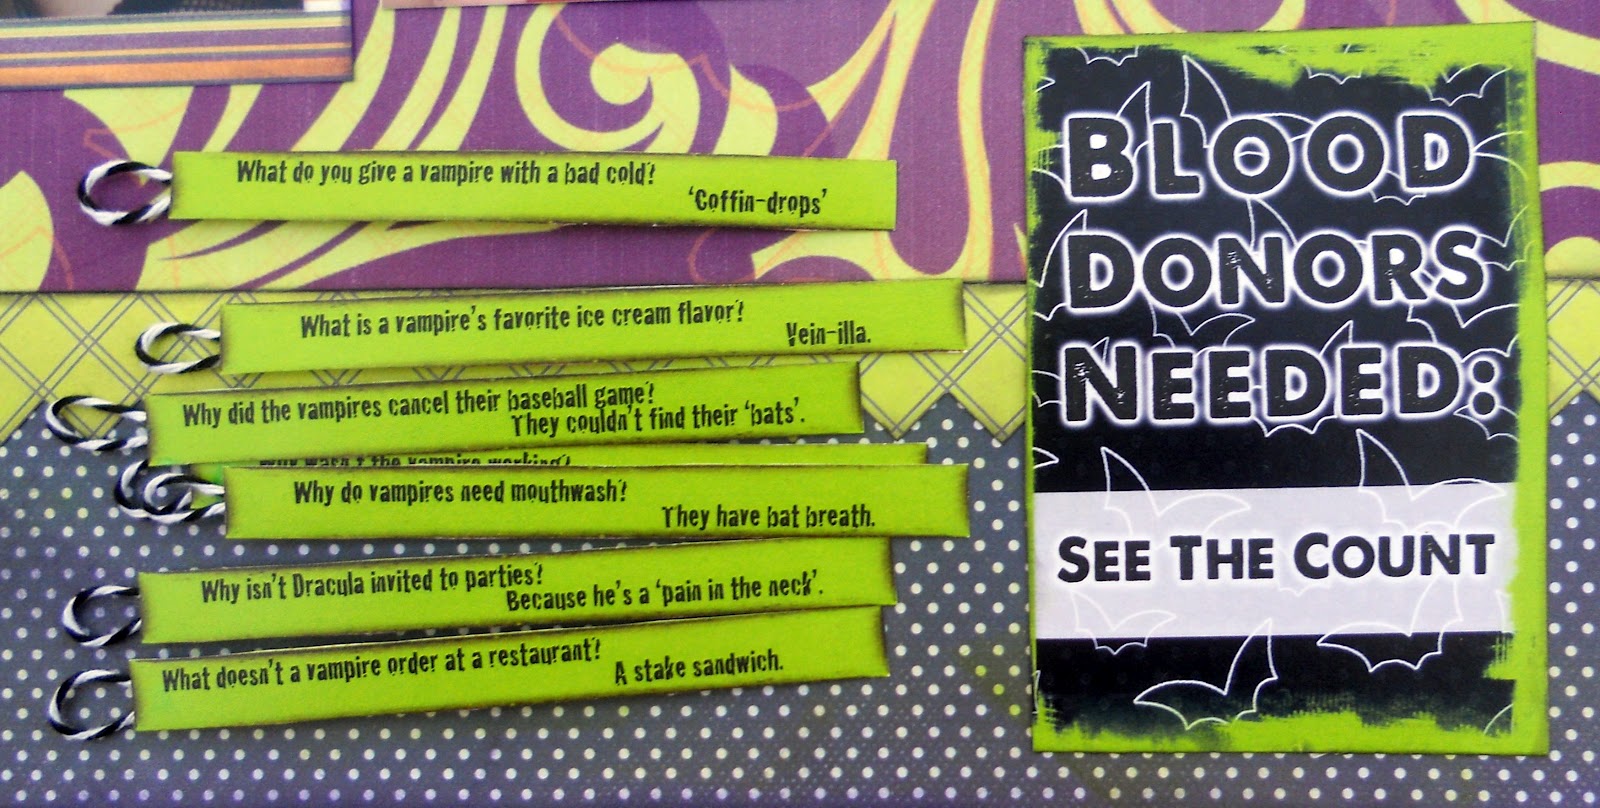
Since I was a vampire this Halloween, I had to use this Blood Donors Needed element. One of the sheets from this line has a whole list of cute word-play jokes. I cut out all the vampire ones and made this into a pocket.

I added some twine around the end so they were easier to pull out and see the answer to the joke.

This spider web and 3 spiders (2 here and 1 on the other page shown earlier) are also new from Quick Quotes. I just pulled them out of the package and put them on the page! So easy!

and I just had to use this Candy is Dandy quote. It matches the purple and lime swirl paper around it and just fits me. 

I hope you have enjoyed the projects I have done as much as I enjoyed playing with all their new lines! And I hope I introduced a couple new people to the wonderful world of Quick Quotes!

Products Used:
Quick Quotes Halloween Line
Quick Quotes Spiders and Spiderweb
Quick Quotes Happy Halloween Hauntings Velum Quotes
Quick Quotes Candy is Dandy Velum Quote
Quick Quotes Halloween elements
**All the Halloween products will be available at Quick Quotes on or after August 23rd.
Quick Quotes Powder Puff Ink in Midnight Confession, Purple Passion and Limeade
Twinery Twine in Charcoal
Want 2 Scrap rhinestones in black

Remember:

Check back later for today's new challenge with Just A Scrappin!

Comment on any Guest Designer Quick Quotes post this month for a chance to enter a giveaway from me of some great Quick Quotes products!


Friday, August 17, 2012

Just Because with Quick Quotes

Hello again! Welcome back to my second project with Quick Quotes!

If you have been watching the new releases from Quick Quotes, you have seen this wonderful line called Just Because. I love that there are so many bright colors in this paper!

The Star-burst paper really stuck in my head so I knew I had to do something with it.
I took 2 of the same star-burst paper used half of each so that I had 2 "corners" where the burst starts from. I wanted to make it look like the star-burst was coming from the side of the paper instead of at the bottom as the paper was designed.

I inked everything in Mango Mai Tai and added it to a orange 12x12 paper from my stash. The lime green mat behind this picture (of me and my boyfriend from our Chicago trip a couple weeks ago. We are infront of the "bean" at Millennium Park) is also one of the papers from the Just Because line.

These are Quick Quotes Fun Flowers that I actually took out of another page kit I had on hand from Quick Quotes (Summer Time) so they were white to start with, but you can get just the chipboard flowers too. I colored them with Quick Quotes Powder Puff Ink in (from right to left) Maraschino Cherry, Blue Hawaiian, Mango Mai Tai, Very Berry and Limeade.

This velum "Fabulous Vacation" was just perfect. I layered it to an element from the Just Because line and added a glittered chipboard bracket, also from Quick Quotes. You can see the other part of it on the left side of my pictured. I inked everything in Mai Tai.

For my last element, I took a circle and wrapped it in stripes of a velum quote. I inked it with Very Berry, Blue Hawaiian and Mango Mai Tai to match the page. The ribbon is also from the Summer Time kit I opened earlier. I layered it to more of the lime green paper and added my notes. I plan on making a second page for this layout that will have more journaling.

I hope you enjoyed my take on Just Because! 

~Liz

Products used:
Quick Quotes Just Because Paper Line
Quick Quotes Powder Puff Ink (Maraschino Cherry, Blue Hawaiian, Mango Mai Tai, Very Berry and Limeade)
Quick Quotes Yellow Ribbon
Twinery Twine from my stash in Pink Sorbet, Cappuccino, Cantaloupe, Shore and Honeydew

REMEMBER:
~Be a follower and leave me a comment on any of my Quick Quotes Guest Designer posts this month to enter to win a prize pack of Quick Quotes goodies!!

~Make sure to check out the current challenge over at Just A Scrappin'!


Wednesday, August 15, 2012

Same Card 2 Way! Part 2

Welcome back to same card 2 ways!

I was working on more Thank you cards. I wanted what I would consider clean and simple. I have been loving working with craft lately so I pulled some of that out. I haven't used my Stampin Up Medallion stamp in a while so I got that out too. Here is what came out

I stamped right on the craft with Stampin Up Cranberry Crisp. The thanks is SEI stickers from my stash. I added some Cappuccino Twinery twine and I thought it was exactly what I wanted.

So again I wanted to turn one into a birthday card. I didn't have any other letter stickers I thought would work so I used this cute sentiment from a Stampin Up set called Bring on the Cake. I stamped it on a cranberry piece, tore the bottom and added a couple layers of twine.

I love that medallion stamp! It really doesn't need too much more embellishment to look lovely!

Remember:

~If you want to see a cute tutorial and enter to win some great Quick Quotes product, check out my first August Guest Designer Post to comment and enter to win! And check back tomorrow for a new project!

~Check out Just A Scrappin this week for a great challenge! The other design team is up this week but they have some great projects to share!

~Liz

Monday, August 13, 2012

Same Card 2 Ways! part 1

Hope everyone is having a good week so far! I am now in Tennessee enjoying some vacation time with my boyfriend and his family.

Sometimes when I make a card, I thought it was so cute/easy/fun I want to make another just like it!
So today, I am going to show you the way I took the same design card and make it for 2 occasions.

I saw the original design in a card magazine from a couple months ago and tucked it away as something I wanted to re-create.
The first one started as a Thank You card. I have been getting requests for these at work lately. The glitter paper is from SEI that I have had forever. The twine is of course from the Twinery, in Charcoal. The sentiment is from a Unity/Jillibean Soup set called Apple Cheddar Soup.

Since I need so many birthday cards, I also wanted to make this into a birthday card. The sentiment I wanted to use, from Close to My Heart, is bigger than the thank you. So I stamped in on another panel and moved the placement. 

I inked the edges of everything with Quick Quotes powder puff ink in Maraschino Cherry.

Remember:

~If you want to see a cute tutorial and enter to win some great Quick Quotes product, check out my first August Guest Designer Post to comment and enter to win!

~Check out Just A Scrappin this week for a great challenge: Celebrate using Pink, White and Blue with pearls or rhinestones. You can see my take on the challenge here 

Lots going on this month! Check back Thursday for another version of same card 2 ways!

~Liz


Thursday, August 9, 2012

Celebration with Just A Scrappin'

Hello again everyone!!

Today I am sharing a card for the Just A Scrapping Challenge this week

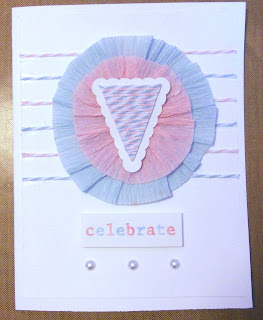
Celebration using Pink, Blue and White with 3 pearls or rhinstones

Sometimes is great working with something so specific :)
I started looking through my stash and saw my Melissa Frances Crepe Paper that has pink and blue in it and went from there. Here is what I came up with:

I used Shore and Blossom twine from the Twinery for the background and the middle of the Stampin Up Pennant punch. I punched the middle triangle of the pennant, ran it through my xyron and covered it in pieces of twine. Just trim the edges and you have your original shape :) Then added it to the scalloped pennant piece from the punch

The Celebrate stamp is also from Stampin Up in a set called Everything Nice. I colored it with Stampin Up Markers in Regal Rose and Bashful Blue on another white piece and pop dotted it. The pearls are from Queen and Co.

I really used a variety of companies on this one! I love the way you can really mix and match your stash of stuff!

I think this would be a great birthday card, or to celebrate a new baby arriva.

Check back on my post from yesterday to enter to win some great product from Quick Quotes since I am their guest designer for August!!

I'll be back next week with some more cards and another Quick Quotes project! I hope everyone enjoys their weekend!

~Liz

Wednesday, August 8, 2012

Cherry Truffle with Quick Quotes

So I have mentioned having some great news. Have I also mentioned I love Quick Quotes?

I am so lucky to get to be a guest designer for them this month! YAY!! Make sure to check out all my posts with them this month for some goodies at the end :)

They sent me tons of awesome product including this versatile line called Cherry Truffle. I look at it an I immediately think vintage so I challenged myself to think outside the box on this one.

I started with the quote "Live in the Moment" and went through some pictures. I love this picture of my boyfriend on his new ATV doing a wheelie. It really just embraces the moment!

 
I used a piece of paper on one edge of the velum to help hold it down and a flower in the other corner

Here you can see the paper layers I used and a close up of the wheelie in action! I also inked all the pages in Quick Quotes Powder Puff Ink in Mocha Mama

I love how this burlap "flower" or star turned out and here is how to make it!

I started with 5 strips of burlap, 5 lengths of twine and a dark velum quote cut into, you guessed it, 5 pieces

Here is what the petal looks like without the velum in it

 But I liked a little bit darker look so I added the velum

 And some glimmer mist (in Roll Top Desk)

 Twisted it back up and hot glued it together. You could also use Beacon's, I just didn't want to wait for all of them to dry

 Then I glued my 5 petals together and added some extra burlap in the middle.

 I added a large brad and my twine to finish it all off! Later on my page I added some flowers on top of the brad.

I hope you like the page and my mini tutorial. If you have any questions, please leave me a comment and let me know :)

Check back next week for another Quick Quotes project!

***GIVEAWAY ALERT***

Comment on any of my Quick Quotes Guest Designer Posts and be entered to win a Quick Quotes Pink Tote bad will lots of Quick Quotes goodies inside! You must also be a follower of my blog. Good luck!

Products Used:
Twinery Twine in Cappuccino
Burlap, flowers and brad from my stash

You can shop these and tons of other great products from Quick Quotes at www.shopquickquotes.com


Related Posts Plugin for WordPress, Blogger...