Showing posts with label christmas. Show all posts

Thursday, December 13, 2012

Shape Card with Just a Scrappin

Welcome back!

This weeks challenge with Just A Scrappin is to 

Make a card that is not square or rectangle!!

Here is my take:
I adore the way this turned out. A perfect card for my boyfriend's grandma if you ask me :)

Here is how I did it:

I cut a bell from the Teresa Collins December 25 Cricut Cart (I believe it was about 4inches) and taped it to the top edge of a folded piece of cardstock the color I wanted my card base to be. Make sure you let some of the top of the design hang off to keep part of the fold intact. This is what will hold your front and back together!


Trace around and take the "template" (the blue piece) off.

Cut on the lines making sure to leave a little piece of the folded edge of your card intact
And that it! Super simple!

Here is what it looks like open

Then just decorate as you want :)
I used the Teresa Collins December 25 cartridge again for all of the cuts on the front of the card. I added some silver stickles on the Joy to give it more interest. There are also red stickles on the holly berries.
The bottom of the bell is Melisa Frances silver glass glitter. Its super chunky and I love it!

Then I just put a simple stamp on the inside.

I hope you join us this week! I would love to see your take on this great challenge at Just A Scrappin!!


~Liz

Tuesday, December 11, 2012

Countdown to Christmas - 14 days!! with MCCR


Welcome back!!
OMG, only 14 more days! I better start my Christmas cards soon!! lol.

Today's theme with My Cricut Craft Room is to 

Use a Licensed Cartridge!

I have been trying to stick with a Christmas/Winter theme for this month's projects so Hello Kitty Friends was a perfect choice!

These are more gift card holders made for the office craft show using Stampin Up's Top Note Die. 

Both cricut cuts are cut at 2.5 inches. Pretty small to work with, but my holders were small. Ideally I wish these would have been closer to 3.5 inches to make it easier. The snowman wasn't bad, but hello kitty was lots of little pieces. But of course she came out wonderfully.

I hope you enjoy and this gives you some motivation to pull out the carts you forgot had Christmas stuff on them!! 

~Liz 

Saturday, December 1, 2012

December 100 Cricut Cart Blog Hop with MCCR

Welcome to My Cricut Craft Room's Monthly 100 Cartridge Blog Hop for December!!


If you got here from Mary's blog, great you are on the right track!
If not, head to My Cricut Craft Room to see all the great projects along the way!!

I had 4 cartridges to use this month. I combined them and made two projects.

For my first one, I wanted to do something Christmas since it is right around the corner


I used Teresa Collins Sophisticated and Gingerbread for this project. The scallop border is from Sophisticated (page 44, cut at 1 inch), the swirl is also from the same cartridge (cut at 2 inches). The wreath is from Gingerbread cut at 2.5 inches.

I added stickles in xmas red, green, gold and diamond to decorate my wreath. The paper is from last year's (I think) DCWV christmas mat stack.

For my other project I still needed some birthday cards so that is what I worked on!!

I used Pretty Pennants and Celebrate with Flourish for this project.
The pennants are cut from Pretty Pennants at 2 inches for the small ones and 3 inches for the large middle one. The happy birthday is from Celebrate with Flourish and was cut at 2.5 inches.
I ran the middle pennant through a cuttlebug folder and sanded the raised area. The pattern paper is from Echo Park - A Walk In The Park 6x6 paper pack. I inked everything in Quick Quotes Powder Puff Ink in Pink Cheeks.

Well I hope that inspires you to get out your cricut and start creating!!

Your next stop on the hop is my DT sister Teresa!!! 
Wait til you see what she has in store for you!

Have a great weekend!!

Here is the full line up in case you get lost along the way!!
Jen 
Liz <--- are="are" here="here" you="you">


Friday, November 23, 2012

Past Christmas Mornings with My Cricut Craft Room

Hope everyone is over their Turkey-coma today and got some great deals on black friday shopping!

Today with My Cricut Craft Room, our theme was past Christmas mornings.

I pulled out a DCWV christmas stack (I have 3 of them so I am not sure which year this one is from) and I saw this LOVE piece that I knew I wanted to use. 

I went through the past 3 years of Christmas photos and found that this is the ONLY picture of both my boyfriend and I on a Christmas day. So sad. So I have made sure to tell him we must get a picture of the two of us on Christmas morning this year.


I used Gingerbread to make my garland. They are all cut at 2inches. I love making the little guy and girl hold hands :)

Add some twine (in Maraschino and Peapod) and that was it! I love how this turned out and how quick and easy it was! This will be the front page in a Christmas album. I think I am going to do all my Christmas photos in one year arranged by year.

I hope you enjoyed my page!

~Liz 

Thursday, July 26, 2012

Glitter and Shine with Just A Scrappin

Hope everyone is having a great week!

This week over at Just A Scrappin' they are challenging us to 

GLITTER AND SHINE

I LOVE this challenge! My mom calls me the glitter queen! If it sparkles, I want it!

I decided to go a little low key and try some new products I got back in May that happen to be shiney

So here is the main card I did
 
 I loved it so much I did 4 more!!!

 I started with cardstock that I cut starts from my cricut

 The white and purple stars are using Mudpuddles. Its like sand in glue! And there is of course glitter mixed in as well :) You just spread it on with a spatula.

 The silver and blue stars are using Melissa Frances glass glitter. When you use this make sure to use a thick glue like Beacons or ZipDry so this thick glitter has something to stick into.

 Once everything was try and I cut off all the excess Mudpuddles, this is what you get!

And some close ups of the other cards I did:

 Sweet and Simple Baby Boy

 Not sure what theme I want to make this one yet. I'm thinking birthday.

 I think I am going to add a guitar to this one a make it a rockin out card.

and I love this Christmas one. Happy Christmas in July!!!

I am off to Chicago this weekend for 3 days, then to Cedar Point for a  day so check back next week for lots of updates!!!

Make sure to check out Just A Scrappin and join me in this great challenge!!

Have a great week!

~Liz

Saturday, December 31, 2011

Merry Christmas and Happy New Year!

Hi everyone!! I have been off work this week and taking a break from everything including blogging! I have been spending some time in my craft room but not as much as I thought I might. It has been nice spending my days with my boyfriend who is on break from school.

But I do have a small project to share with you that I made for my mom for Christmas. She has so much crafty stuff it has become hard to remember what she does and doesn't have! But even if your supply list is small this is a great idea for anyone to have. I made her a new craft index!

I used Bo Bunny's Gabrielle line. I knew I wanted to do something for my mom with this line. She loves butterflies. I purchased large index cards on a spiral. I got the large ones so you have more room to write. I covered the front with one of the papers and cut out the large butterfly from a different one. I used some crepe paper in the upper right corner and cut out another edge swirl to layer over top. I used a Stampin Up set with a white acrylic paint dauber to get the white swirly circles on the left and right sides. I added some dot paper on the bottom and a Bo Bunny sticker layered with more paper. I love the saying since scrapbooking is all about color and friends! Used some small Bo Bunny alpha stickers and you are done! My mom can add tabs at the bottom once she decides how many sections she wants and how big they need to be.

Every crafter should have this with you when you go to the store or to a big convention. Don't buy what you already have! You can list inks (even stamp a little image in the ink so you know what color it is), die cuts, paper packs, punches, markers or anything else you need to keep track of! I have a big one for at home but I {try to remember to} take this with me when I go shopping or to conventions.

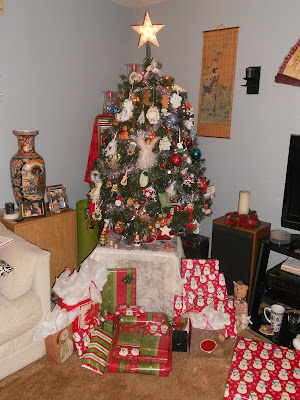
And I have to share my Christmas tree this year. It is a small one that was my grandmothers. Every year my mom and I get each other at least 1 ornament so it is really full! And now my boyfriend gets me an ornament each year as well.


He was doing his best impression of the reindeer on my ornament :)

Hopefully I will get some projects actually DONE today and be able to post more this weekend before its back to work Tuesday.

~Liz

Thursday, December 15, 2011

Christmas Cards 2012

Merry Christmas!!!

I wanted to share my Christmas Card for this year. I knew I wouldn't have a ton of time to work on them with all my other crafty projects I am doing as gifts so I choose a simple card to make. I love the way it turned out!!


DCWV mat stacks made this card super quick and easy. I used their Christmas mat stack from this year. I cut 1inch strips from different pattern papers. I didn't have to cut the other length since I was using the mat stack so just 1 cut! I told you these were quick. I cut the reindeer (that may look familiar to you, I told you it was my new favorite Cricut cut!) from Christmas Solutions Cartridge. I added a red bling to make it Rudpoph and used Close to Cocoa Stampin Up marker to color the lines on the cut and the feet.

Hope this goes to show that hand made cards don't have to take forever! There is still time to make yours :)

~Liz

Friday, December 9, 2011

Gift Card Holders 2011

Hi all!

It is that time of year for all things Christmas :)
My Mom and I participated in our job's entrepeuner show again this year and made more gift card holders! You can see some of last year's here. 

I have a lot more pictures this year and want to give a little info on how I did some of these so I'm going to spread this into a couple of different posts.


This is one of my favorite ones this year. For the ornament on the right: I took Tim Holtz tissue tape and stuck it to a non-stick craft mat. I used alcohol inks to color it red. I pulled the tape off the mat and tore the edges to fit onto a white panel that you can see in the picture below (upper left holder). I punched out the ornament using a Stampin Up punch. I used the punch piece on the holder above and the negative below! For the negative I just put a piece of gold cardstock behind the image and used a gold Krylon pen to edge the panel and the holder. 2 items from 1 great technique I saw in a magazine :) Definitely going to be doing that again!


I loved the way all of these turned out and everyone else must have too because we sold out!!!

More Christmas holders to come next week! Hope to inspire everyone to work on their Christmas cards (if you are as behind as I am!)

~Liz

Thursday, December 8, 2011

Christmas Ornament Gift

Hi all!

I have had a BUSY couple of weeks! I think I am finally feeling all better and have had some time to do some crafting. Yay!

I have had this wood cut-out ornament from Archiver's since LAST YEAR! I forgot I had it last year so I pulled it out to do a handmade gift at our crop's handmade gift exchange. You don't know who will get your gift until you get there so I thought an ornament is always a great idea. My mom and I have a tradition that we get each other at least one ornament every year. So I have a very full Christmas tree full of ornaments going all the way back to my first Christmas! Someday I want to make a scrapbook of all my ornaments so I can try to remember where I got each one and why it was special that year. 

When I was trying to think of what to wrap it in, I remembered I got these cute little pouches with a tag from the Mega Meet last year at Melissa Frances' booth. They were super cheap since they were punched wrong (you wouldn't know that since I covered the punch holes) :)

So here is my wrapping and my ornament. I am entering this in a couple of challenges this week.
Over at Papertake Weekly they are having an Anything Goes challenge with the additional option of adding something dangly :) Right up my alley. Wee Memories is also doing a Free for All! Woopie! Lastly For Fun Challenges is challenging us to make Christmas Sparkle! I love sparkle! Let me show you what I did


I love this reindeer from the Cricut Christmas solution Cartridge. I knew immediately I wanted to use him on this. I pulled out my DCWV Christmas stack and found some paper I liked. I choose this pattern since it already looked layered so I didn't have to do anything more to it. I inked the edges with QQ Powder Puff ink in Mocha Mama and added hand stitching Stampin Up! Close to Cocoa.


 I cut a random shape to put the Noel on (I don't remember which cart that is from). I used my liquid pearls to add the white dots to the word. I cut strips of green paper and folded them to look like a ribbon behind the phrase. I used glimmer mist (graphite), my first Christmas sparkle, on the reindeer, the whole phrase with ribbon and the flowers. I used a different glimmer mist (brick) on the chipboard swirls. I love glimmer mist to make everything sparkle!


One you pulled out the tag, which I covered in red paper, you see a white pocket with the ornament inside


Here is the ornament I did. It came in a pack of 2 from Archiver's. They have all kinds of different shapes to choose from. I painted it all white so you couldn't see the brown wood of the cut out. Then I used modge podge across the top and with Martha Stewart glitter, my second Christmas sparkle! It doesn't get much more sparkly thank that! I sprinkled the silver randomly, then I took the red glitter and covered everywhere else. I took some silver bells, my something dangly, and tied them with twine to the ornament so you can hang it from the tree!

I had a TON of fun making this gift pouch and ornament. I hope the recipient enjoys it for years to come :)

~Liz


Wednesday, November 30, 2011

Class pages update

Hi again all!
I wanted to post the pictures of my September and November class pages. I don't do a layout class in October, I normally do a more involved class. This October I did the advent calendar you can see here which will be featured in an upcoming Cricut Chirp newsletter (yay again!)

For September I decided to do a different kind of baby page. My club members had been asking for this for a long time and I was hesitant to do it. It ended up being one of the hardest pages for me to get ready for class. I asked the club ladies if they wanted girl boy or neutral and all my extra kits I did in neutral. Here is what it looked like.
I don't remember where I saw the title but I loved it! I can just see a cute black and white picture of a newborn or "just bloomed" baby in there! I did keep a couple extra of this page for myself to make and give away as gifts for 2 friends who had babies this year. I got the pictures printed so now I just need to make their pages. For the girl or boy ones, the title and swirls on page one, and some of the flower layers on page two were pink or blue. They came out very nice as well. I was really happy with this page and so were the ladies.

For November I was originally going to do a Thanksgiving page. We can always use more of those! It happens every year :) But, since my Christmas advent calendar class had gotten cancelled, I had all the paper and cut sizes ready to go for that so I decided to re-purpose them and here is what I came up with
The red space in the middle is exactly 6 inches wide so I can fit 3 landscape 4x6 photos in there! Or get more creative and do some sort of photo collage (which is what I plan to do). I thought with everything going on in the squares the page didn't really need a title which is a first for me! I can't wait to get some pictures on this one and add some stickles to the squares. Here is some close ups of the two pages

As always I hope I inspired you to bring out your scissors and glue!
Until next time!
~Liz

Saturday, November 19, 2011

Woo Hoo!!

Hi all! I can't believe isn't been so long since I have posted! I thought there couldn't be a better reason to post than today! I got an email that the advent calendar I created for a class (that got canceled sadly) was chosen  by Cricut to be featured in an upcoming Chirp newsletter!! I assume is will be closer to Christmas since it is a Christmas Advent calendar. So everyone go sign up to get the newsletter :)


Since I am not at home this week, I vow to try to get caught up on everything I have done for the last couple of weeks when I do get home after Thanksgiving.

While I am here I can also tell you a little bit about the Great Lakes MINI Meet. The Mega meet held the mini meet in Toledo, Ohio for the first time this year. Which is closer for me so mom and I went to Toledo for the day on Friday. I had a great time and plan to go back next year. I took a great Halloween chipboard album class from an Ohio local scrapbook store, Scrap Happy Ohio. I think I might just have to take a road trip to Tiffin soon! And did lots of great shopping. Picked up a couple of new things that I will share soon :)

In the meantime, I want to share the birthday card my mom made for me


We ordered the Cricut Cart and stamp sets from Close to My Heart and this awesome Halloween stamp set was the stamp of the month. For those who may not know, my birthday is Halloween so I LOVE everything Halloween. My mom stamped this image and used pearlex to color it. Then used deco scissors and a silver krylon pen around the edge. Then layered it with another panel of pearlex and deco scissors and silver krylon. LOVE IT!!!

Until next time!

~Liz

Thursday, August 4, 2011

Christmas in July a little late!

I wanted to post this for Christmas in July but work and home life seem to have kept me busy!

In December every year, the crop I attend does a Christmas party. You bring a gift (it doesn't have to be crafty) and they draw names to exchange gifts. Last year I got a cookie in a jar gift. They were so yummy! For my gift, I make some cute little mangents, threw in some stickers and made this tag from Tim Holtz's 12 tags of Christmas. You can see his tag here. I knew I was going to love this tag so I made 2. One for myself that I still have. I have no idea what to do with it, but I love it too much to give away.


I trired to follow as close to Tim's tag as I could and I just LOVE the way it came out. The large brad in the middle of the rosette and the rub on are from Quick Quotes. The stamp is Stampin Up!'s french script. The words were cut from Blackletter and covered in crystal laquer. The silvery stuff behind the rosette was actually a small $1 wire christmas tree that I cut some branches off. I loved that it was on wire so I could shape it to how I needed it. I think the rest of the stuff was all stuff in my stash (and by my stash, I mean my moms LOL Thanks again mom for letting me use your room to supply  my habit)

Hope this gave you some inspiration to start working on those Christmas projects that we will be running out of time to finish sooner than you think!

I am trying to get motivated to work more on a Christmas advent calendar I am teaching at our weekend crop in October and I think posting out this tag was just the thing! Sketching ideas to work on tonight when I get home :)

~Liz
Related Posts Plugin for WordPress, Blogger...